Creating a sales funnel in WordPress is one of the smartest ways to turn website visitors into leads and customers. Instead of sending all visitors directly to a product page, a sales funnel guides them through a structured journey that builds trust, explains your offer, and encourages them to take action. With the right plugins and strategy, WordPress can become a powerful funnel-building platform for businesses, marketers, and online store owners.
In this guide, we will go through the process of creating a sales funnel in WordPress step by step, including the tools you need and best practices for improving conversions.
What Is a Sales Funnel?
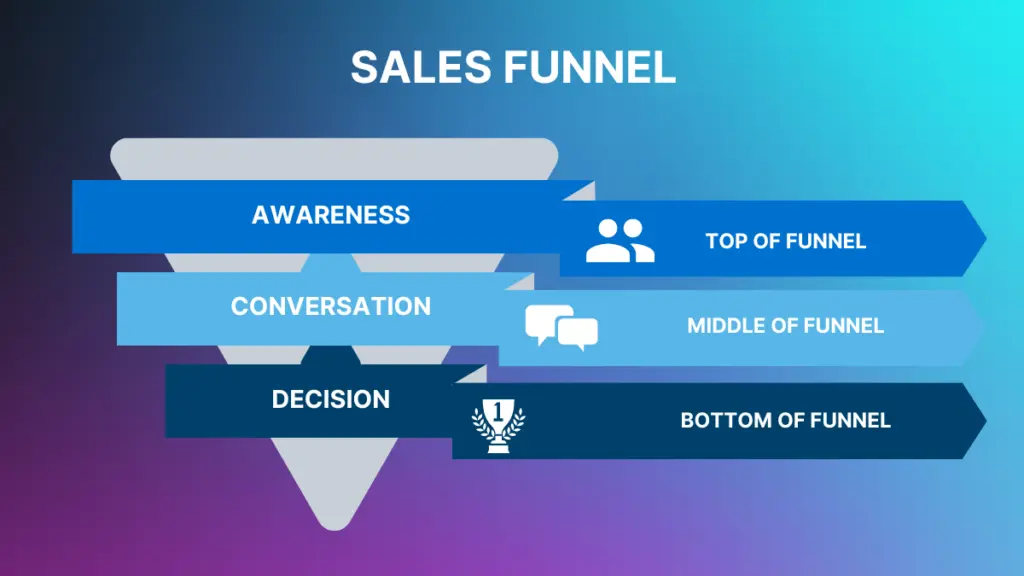
A sales funnel is the process that moves visitors from the first interaction with your website to becoming customers. It is called a funnel because many people enter at the top, but only a percentage complete the final action such as making a purchase or signing up for a service.
A typical sales funnel includes several stages:
- Landing Page
- Lead Capture Page
- Sales Page
- Checkout Page
- Thank You Page
- Email Follow-Up
Each step has a specific goal, and together they create a system that increases conversions and sales.
Why Use WordPress for Sales Funnels?
Many businesses use WordPress for funnels because it is flexible, affordable, and highly customizable. Unlike some funnel platforms, WordPress gives you full control over your website and data.
Some advantages of using WordPress include:
- Full control over your website and content
- Thousands of plugins and integrations
- Lower cost compared to funnel platforms
- Works with payment gateways and email marketing tools
- Highly customizable design and functionality
With the right setup, WordPress can function as a complete marketing and sales system.
Tools You Need to Build a Sales Funnel
Before building your funnel, you need to install several plugins that will help you create pages, manage checkout, and build funnel steps.
Some of the most popular tools include:
- Elementor – for designing landing pages and sales pages
- WooCommerce – for payments and checkout
- CartFlows – for creating funnel steps
- WPForms – for lead capture forms
- Email marketing tools like Mailchimp or ActiveCampaign
These tools work together to create a complete funnel system inside WordPress.
Step 1: Create a Landing Page
The landing page is the first step of your funnel. This is where visitors arrive after clicking an ad, search result, or social media link. The goal of the landing page is not to sell immediately but to capture attention and move visitors to the next step.
A good landing page should include:
- A strong headline
- A short description of your offer
- Images or a video
- Benefits of your product or service
- Testimonials or social proof
- A call-to-action button
- A lead capture form
The most important thing to remember is that a landing page should focus on one goal only. Too many links or distractions can reduce conversion rates.
Step 2: Capture Leads
Lead capture is an important part of any sales funnel because most visitors will not buy on their first visit. Collecting email addresses allows you to follow up later and continue marketing to potential customers.
You can capture leads using:
- Email signup forms
- Free ebooks or guides
- Discount codes
- Free trials
- Webinar registrations
Once a visitor enters their email, they move deeper into your funnel, and you can send automated emails to build trust and promote your product.
Step 3: Create a Sales Page
The sales page is where you explain your product or service in detail and convince visitors to buy. This page should focus on the problem your audience has and how your product solves that problem.
A high-converting sales page usually includes:
- Problem and solution explanation
- Product or service description
- Benefits and features
- Testimonials and reviews
- Pricing information
- Guarantee or refund policy
- Call-to-action button
The sales page should guide visitors toward the purchase decision step by step.
Step 4: Set Up Checkout Page
The checkout page is where customers complete the purchase. Using WooCommerce and CartFlows, you can create optimized checkout pages designed for higher conversions.
You can improve checkout pages by adding:
- Simple checkout forms
- Multiple payment options
- Order bumps
- One-click upsells
- Discount codes
A smooth checkout process is very important because complicated checkout pages often cause customers to abandon their purchase.
Step 5: Create a Thank You Page
After the purchase or signup, visitors should be redirected to a thank you page. This page confirms the action and tells the customer what happens next.
A thank you page can include:
- Order confirmation
- Download links
- Instructions or next steps
- Upsell or cross-sell offers
- Social media links
- Referral program invitation
This page is also a good opportunity to continue engagement with the customer.
Email Automation and Follow-Ups
Email marketing is an essential part of sales funnels. Many people will visit your website but will not buy immediately. Email automation allows you to send follow-up emails that educate, build trust, and promote your offer.
A basic email sequence might include:
- Welcome email
- Educational content
- Product benefits
- Customer testimonials
- Special discount or offer
- Reminder emails
Automated email sequences can significantly increase conversions and sales over time.
Tips for Improving Your Sales Funnel
Once your funnel is created, you should continuously improve it. Small changes can make a big difference in conversion rates.
Some important optimization tips include:
- Use clear and simple headlines
- Keep pages clean and not cluttered
- Add testimonials and social proof
- Optimize pages for mobile devices
- Improve page loading speed
- Test different headlines and buttons
- Use strong call-to-action buttons
- Track conversions using analytics tools
Sales funnels are never perfect from the beginning, so testing and improving is a continuous process.
Conclusion
Creating a sales funnel in WordPress is not very difficult if you use the right tools and follow a structured process. A typical funnel includes a landing page, lead capture, sales page, checkout page, thank you page, and email follow-up sequence. Each step moves the visitor closer to becoming a customer.
WordPress combined with tools like Elementor, WooCommerce, CartFlows, and WPForms allows you to build a complete funnel system without needing advanced technical knowledge. Once your funnel is set up, the most important part is optimization, testing, and improving conversions over time.
A well-built sales funnel can turn your WordPress website into a powerful marketing and sales machine that generates leads and sales automatically.
For more articles click here.